To ensure test accuracy, EyeDetect requires that an examinee’s eyes are calibrated to the Eye Tracker hardware for each test. We recommend that the Proctor calibrates to verify the settings before going through this process with each examinee.
Calibration consists of the four steps listed below:
- Connect the Eye Tracker. This is a software connection; these steps assume you have already connected the Eye Tracker hardware. The Proctor will typically only need to do this once per day, unless you turn off the system or close down EyeDetect during the day.
- Set the Telemetry of the Eye Tracker.
- Calibrate the Eye Tracker.
- Validate Eye Tracker settings.
These steps typically take less than five minutes. See details below.
Step 1: Connect the Eye Tracker
Select a test from the EyeDetect test grid. If there are no tests listed in the EyeDetect test grid, create one. If the Proctor doesn’t have the names of those to be tested, the Proctor should create a temporary test for the purposes of calibration.
Choose Eye Tracker > Connect. It may take a moment for the connection to be made. During this time, you will see a spinning progress image on the Connect button.
When the connection is successful, you will see a success check mark on the Connect button. Then choose OK.

You should now see red lights at either end of the Eye Tracker hardware. This is another indication that it is connected and ready to use.
Step 2: Set the Telemetry of the Eye Tracker
Telemetry is the process of taking measurements from a distance. When the Proctor sets up the Telemetry for the Eye Tracker, it ensures that the hardware and environment are set up correctly.
Note: The Proctor can only set the telemetry after the Eye Tracker is properly connected.
The following are the steps needed to set up the telemetry prior to doing so with an examinee:
- Sit in front of the EyeDetect Station and place your chin on the chin rest, just as an examinee would.
- From the EyeDetect software menu, choose Eye Tracker > Telemetry.
- Adjust the position of the chin rest and/or monitor until the distance from the Eye Tracker is 60 cm.
- Adjust the position of the chin rest and/or monitor until the eyes are approximately in the center of the screen.
- At this point, the green progress bars at the bottom of the Telemetry box should fill up. If not, make fine-tuned adjustments until the green progress bars are full. Once they are full, click Close.
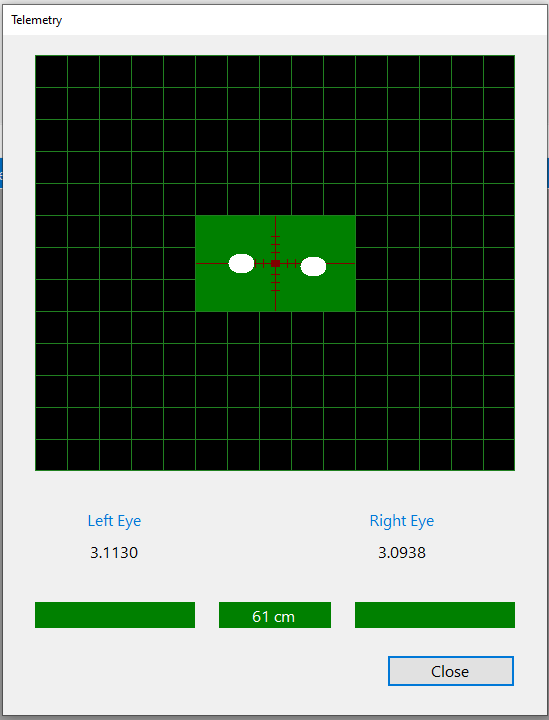
Immediately move on to the Calibration step, below.
Step 3: Calibrate the Eye Tracker
The calibration step ensures that the Eye Tracker is working correctly with the current settings. During calibration, the Proctor will sit at the Test Station and follow a red dot on the screen with the eyes while keeping the head still.
- Start this process immediately after completing the Telemetry step (while the Proctor’s chin is still in the chin rest).
- From the EyeDetect Software menu, choose Eye Tracker > Calibrate.
- A red dot will appear on the screen.
- Follow the red dot with your eyes. It will move between several different points on the screen. Do not move your head when following the red dot. Just move your eyes and focus on the red dot.
- When the pattern is completed, the calibration screen will close automatically.
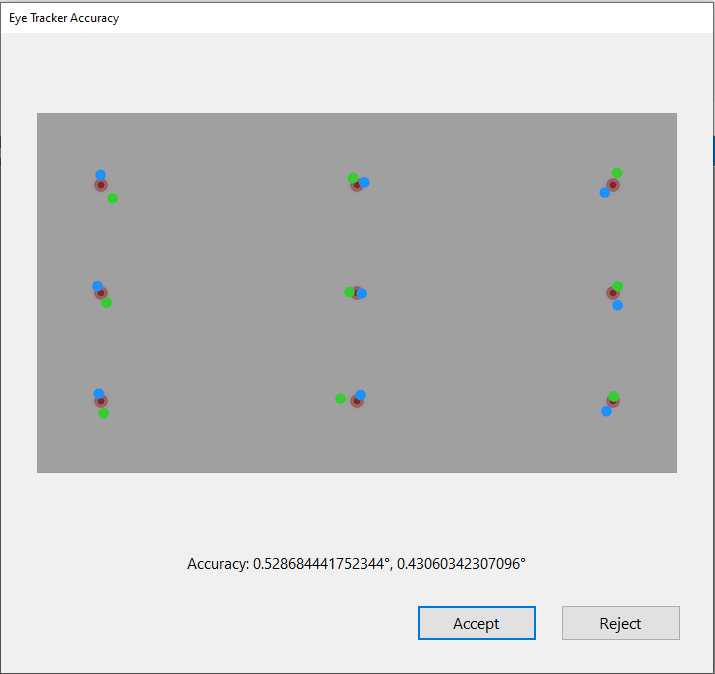
Step 4: Validate Eye Tracker Settings
The final step is to validate the settings. If the Eye Tracker is set up correctly, then the Proctor is ready to proceed with a test. If not, please go through the Calibration steps again.
To validate the Eye Tracker Settings:
- Choose Eye Tracker > Validate.
- The Proctor repeats the same steps as the Calibration, following the red dots with the eyes.
- A validation screen appears (as shown below with four red dots and an accuracy score at the bottom), showing the accuracy of the eye tracking.
- The small red and white dots shown above are the ideal settings for the Eye Tracker. The larger red dots show the measured settings for the current set up. Refer to the Accuracy details at the bottom of the dialog box, immediately below the image. Ideally, the Left and Right values should be lower than 0.5. However, settings as high as 1.5 are acceptable, if that represents the best effort of the examinee.
- Choose Accept to continue with the settings, or Reject to go through the Calibrate and Validate steps again.
*If using a Tobii Eye Tracker, the examinee will follow a red circle on the screen in the calibration step. The examinee will not do anything for the validation step.
Note:
If using an SMI Eye Tracker, There are three levels of calibration. The Proctor must accept a calibration before continuing.
The first level requires the examinee to follow two points on the screen. If that doesn’t produce correct results, the examinee will follow five points on the screen. If that doesn’t produce correct results, then the user will need to follow five points on the screen with a mouse.
If the examinee does not calibrate his/her eyes because s/he appears to be uncooperative, the Proctor should warn the person that failure to calibrate will be reported as a test failure.
Remind the examinee to focus on the red dot. If, after three attempts with the mouse-click calibration, an acceptable calibration isn’t achieved, the examinee should not be tested.
Comments